This is our animation we have created to help us create the film.
Thursday, 16 December 2010
Audience Research
Unfortunately one of our audience focus group is being uncooperative and refusing to comment on our music clips so we've had to replace the person with somebody else.
Animation process
During the animation process, I forgot to save the images from the video we created thus having to start again next lesson. This slowed down progress and put us slightly behind.


Audience Research
To make sure that other people would agree with our choice of music we asked our focus group for feedback on our decision.
Shot List
These are the shots we are using in the feature film, in order.
Shot 1: Close up of lighter
Shot 2: Close up of lighter with door in background
Shot 3: Long shot of the door to the room
Shot 4: Close up of the light switch including a pan whip to the light
Shot 5: Long shot of the zombie in the corner of the room
Shot 6: Long shot of girls feet in the door way
Shot 7: Extreme close up of the girls eye
Shot 8: Close up of feet running away
Shot 9: Long Shot of the corridor with doors on either side
Shot 10: Close up of a door on the left side of the corridor
Shot 11: Long shot of the corridor with doors on either side again
Shot 12: Close up of hand turning door key
Shot 13: Midshot behind the girl with the pan going down her body, door visible infront.
Shot 14: Close up of the door banging, zombie on other side.
Shot 15: Close up of girls feet, camera panning up her body.
Shot 16: Close up of Lighter flicking
Shot 17: Jump shot of lighter flicking
Shot 18: Close of lighter flicking this time door is in sight.
Shot 19: Close up of a clock on the wall, it's midnight
Shot 20: Close up of girl's ragged face
Shot 21: Titles

Location
We have decided to use parts of the college for our locations, this is because we realise we have limited time and would like to put more effort into the filming and planning of the story. The parts of the college we will use are the main corridor and an empty tutor room, also these areas will be relatively easy to gain permission to use.
Wednesday, 15 December 2010
Music
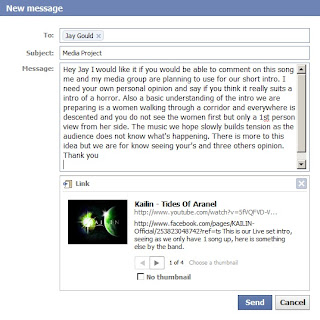
While I was drawing the storyboard up for the sequence, Dan was listening to non copyrighted music the college provided for us and found an excellent piece called 'Activate - X-Ray Dog
Monday, 6 December 2010
Synopsis
This is a brief explanation of what will happen in our opening sequence: A girl (of target audience age) she hears a bang and walks into the room, flicks the light on and sees a huddled figure in the corner. The light turns off and she runs away, she can hear the figure advancing towards her. The she runs down the corridor, she stops, you can hear her heavy breathing, she flicks a lighter on infront of her face, you can see the figure behind her. The lighter flicks off, she yelps and then you hear a growl and a thud (her falling on the floor) then like an eating noise and then the lights come on and you can see her dead body, the titles appear across her body, music plays 'let it shine'. The titles will appear in some sections where light is shone.
Thursday, 2 December 2010
Genre Research Summary
We have done research into other films of our chosen genre (horror) and have found key conventions to making an effective opening sequence.
The titles are often in red text with black background, as these are colour associated with scary things like death and Halloween, we have decided to incorporate this into our opening sequence.
The music is often slow to build up tension with non diegetic sounds such as screaming and heartbeats which help create enigma for the audience, we have chosen to use these in our piece of film.
We have found the characters of a horror film are often introduced as perfect with underlying mental issues or no main character is introduced and just clips of gruesome, scary scenes are played to explain part of the plot to the audience. Perfection is often contrasted with blood and inhumane imagery which we think is a good idea and might use this in our opening scene.
With regards to mise en scene, bright rooms inside large buildings are used to create tension and contrast with dark costume. Also zombie make-up (eg. blood, contact lenses) is one of our ideas to shock the audience like in films such as 'Dawn of the Dead'.
Popular narrative codes in horror films are often ellipses, with slow music and tension also creating enigma for the audience. These are what we will apply to our opening sequence.
Cinematography is a key convention to creating an effective horror genre opening sequence, close ups, varying fast pace to slow pace editing and slow zoom shots to force the audience to focus on important images that are vital to the film.
Target Audience Research
A member of our group set up a focus group and we asked them specific questions about what types of horror they like and why, this has enabled us to discover what type of horror we should create and what our opening sequence should include as some ideas appear to be quite popular. We will try and use the most popular ideas from these comments and incorporate them into our sequence.
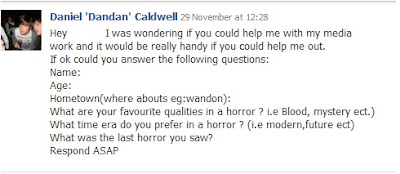
Here are our responses:
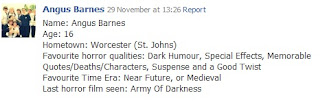
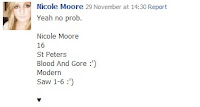
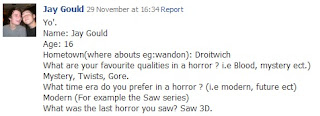
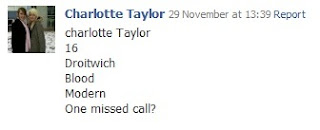
Here are our responses:
Target Audience
We have decided that the demographic target audience for our opening sequence will be B, C1 and C2, as it is a low budget film we cannot afford special effects so we have included enigma codes as this appeals to more higher class audiences, it requires them to think more about the plot of the film, it is more niche. Mixed Gender that like horror films and are quite intelligent so they can understand the twists in the plot which most horrors include.

The psychographic audience will be individualists, again because this is a low budget opening sequence and enigma codes are used to create a sense of narrative.
Tuesday, 30 November 2010
Genre Specific Analysis- Dawn of the Dead & American Psycho
The opening scenes of Dawn of the Dead instantly illustrate the genre of the film by use of editing, cinematography, mise en scene and sound.
 The black background and red text stands out immediately and shocks the audience, these colours are associated with gruesome things which gives the film a horror feel.
 The opening scenes are edited so there are shorts, shocking clips in between the credits in text. The clips make the whole opening sequence look broken and fragmented which represents society and peoples emotions at this time in the film, this all contributes to the audiences knowledge of the kind of horror film this is. Also the clips vary from being played at a fast pace to a slow pace, which builds up tension and almost gives an adrenaline rush feel.

The fact that a hand held camera is used shows use of cinematography to create a state of panic as the camera is constantly jaunting. Also the shots are sometimes unclear because of this which creates mystery for the audience as they cannot always see what is happening yet they know it is something bad which creates tension.
Diegetic sounds of screaming and are used which also builds up tension when the audience cannot see what is happening. Screams of terror are often used in horror films to show emotion. Contrastingly, slow music is played in the background, this use of non diegetic sound is used to build up tension. The fact that slow music and flashes of clips are played together, builds up a sense of panic.
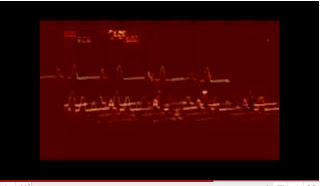 Also the heart rate monitor makes the audience associate the film with life and death and what is in between which represents the theme of the film. The colour red is also associated with blood which all relates to horror.

 Also a wide angle close up is used to force the audience to focus on how obsessive he is about his appearance which makes them realise its actually not normal. The peeling off the mask represents how he is perfect on the outside but not right on the inside and this is confirmed when he confesses later in the narrative.
The use of narrative tells the audience he is proud of what he does and when he talks about bloodlust as if it is a normal thing the audience know this is a horror/thriller film.
 With regards to mise en scene the audience can tell the character is average as he wears normal clothes, we do not see anything abnormal apart from his obsessive morning routine, this builds up tension as it contrasts with the title of the film, the audience are waiting to see something psycho in him.
The non diegetic music is relaxing and mesmerising which makes us want to relax, however the audience are beginning to get an idea he's not normal and feel tense as a result.
The whole opening sequence is a juxtaposition as the normality of his voice, looks and actions contrasts with the violent things he says he likes.
 The black background and red text stands out immediately and shocks the audience, these colours are associated with gruesome things which gives the film a horror feel.

In addition to this with regards to mise en scene, the majority of the costume are ripped clothes and dark colours which suggests to the audience the film is quite violent and associated with death.
The fact that a hand held camera is used shows use of cinematography to create a state of panic as the camera is constantly jaunting. Also the shots are sometimes unclear because of this which creates mystery for the audience as they cannot always see what is happening yet they know it is something bad which creates tension.
Diegetic sounds of screaming and are used which also builds up tension when the audience cannot see what is happening. Screams of terror are often used in horror films to show emotion. Contrastingly, slow music is played in the background, this use of non diegetic sound is used to build up tension. The fact that slow music and flashes of clips are played together, builds up a sense of panic.
 Also the heart rate monitor makes the audience associate the film with life and death and what is in between which represents the theme of the film. The colour red is also associated with blood which all relates to horror.
In the opening scenes of the horror film American Psycho cinematography, editing, mise en scene and sound show how the genre is introduced to the audience.
The slow pace of editing makes the sequence seem really sinister as it is mixed with the diegetic sound of him talking in a slow, low tone voice contrasts with the things he's talking about as they turn from OCD-like, perfectionist things to violent, psycho things.

Cinematography is used to zoom in slowly to a close up of his face, which creates intensity and forces the audience to view his perfection. Also the dull colours with a splash of red at the side makes the audience relate to blood and the fact that he might be violent, if not we just get the feeling that something is shocking.
 Also a wide angle close up is used to force the audience to focus on how obsessive he is about his appearance which makes them realise its actually not normal. The peeling off the mask represents how he is perfect on the outside but not right on the inside and this is confirmed when he confesses later in the narrative.
The use of narrative tells the audience he is proud of what he does and when he talks about bloodlust as if it is a normal thing the audience know this is a horror/thriller film.

The whole opening sequence is a juxtaposition as the normality of his voice, looks and actions contrasts with the violent things he says he likes.
Monday, 29 November 2010
Genre Moodboard
This mood board is generally to show what kind of things we are interested in, in a horror and images for ideas of things we might include when creating our 2 minute opening sequence.

First Ideas
I am working with Luke Hanley and Dan Caldwell. We decided to work with horror genre and from asking a few people from our chosen target audience; males and females aged 16-21, we found that horror was generally popular.


How does the credit sequence from Dexter work?
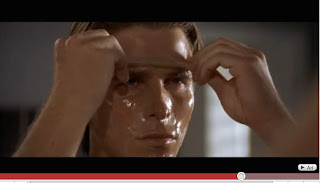
The creative ideas for the film Dexter came from normal everyday things, the opening sequence makes a normal morning routine look sick and sinister.
The character Dexter is seen as an average working man, who takes care of himself, however the audience gets the sense that something is not quite right, as we see a lot of close ups of violent actions that are actually just everyday movements. We don't really notice they are violent until the sequence plays them slowly.

This tomato sauce splatter is a norm, however as red splatters are repeated in a violent way (on a knife) the audience links it to blood. Also this can be linked to the characters job as he is a blood splatter expert.
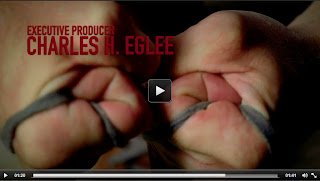
 This shoelace is pulled so tightly the audience relate it to strangling someone however it is an every day thing. These things seem innocent on the surface but there is a deeper meaning, an undercurrent of violence which basically explains the main characters personality.
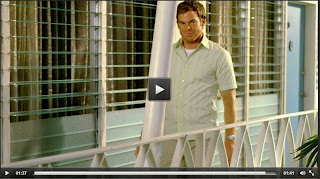
The character is shown looking average at the end of the clip but gives a kind of smile that suggests he's been up to no good almost sinister, making the audience think about the violence he used in his every day activities and what they say about his personality.

Here the narrow depth of field is used to force the audience to focus on an average thing, but as we look at it so close it looks unpleasant, almost gruesome, giving the first few minutes of the film a horror feel.
The use of music is very relaxed and calm, it gives the opening scene an eerie feel as it juxtaposes with the violent, yet normal clips of his actions. I think this was chosen over the Xploding plastix track as it makes the character seem more average, which creates more mystery and questions about his personality and the rest of the film.
The character Dexter is seen as an average working man, who takes care of himself, however the audience gets the sense that something is not quite right, as we see a lot of close ups of violent actions that are actually just everyday movements. We don't really notice they are violent until the sequence plays them slowly.

This tomato sauce splatter is a norm, however as red splatters are repeated in a violent way (on a knife) the audience links it to blood. Also this can be linked to the characters job as he is a blood splatter expert.

 This shoelace is pulled so tightly the audience relate it to strangling someone however it is an every day thing. These things seem innocent on the surface but there is a deeper meaning, an undercurrent of violence which basically explains the main characters personality.
The character is shown looking average at the end of the clip but gives a kind of smile that suggests he's been up to no good almost sinister, making the audience think about the violence he used in his every day activities and what they say about his personality.

Here the narrow depth of field is used to force the audience to focus on an average thing, but as we look at it so close it looks unpleasant, almost gruesome, giving the first few minutes of the film a horror feel.
The use of music is very relaxed and calm, it gives the opening scene an eerie feel as it juxtaposes with the violent, yet normal clips of his actions. I think this was chosen over the Xploding plastix track as it makes the character seem more average, which creates more mystery and questions about his personality and the rest of the film.
Monday, 22 November 2010
Research: Analysis of the Opening of Juno
Our next task was to look deeper into the analysis of the opening of a film called Juno this is what I found:
 This shows how she is real and then walks into cartoon drawings, this suggests that the film will be childlike as the image shows she is real but everything else around her is not, this tells the audience she is not really mentally grown up yet.
The fact that the film is produced by Fox searchlight pictures tells the audience the film is made by a well known company but is indie style, most attracting an adolescent audience. We can also tell this by the way the character is dressed; jumper, jeans and plimsolls suggests that the film is for a younger, more relaxed audience.

The fact that the cartoon background is in one dull colour and the girl is in colour suggests that she is the main character all the way through the film, as this is what the audience is constantly viewing and being informed about. Also, with regards to mise-en-scene, the fact that she dresses like a tom boy tells the audience about her personality, making the audience believe this isn’t going to be a completely girly film.

At two points in the opening sequence runners from the college go past in the background wearing yellow. As the main girl is not wearing college clothes or running, this emphasises the fact she is not in college. Also she is carrying a bottle of sunny D which is yellow this shows use of enigma to draw the audience in, why is the girl drinking so much sunny D and not exercising like other people her age?

As we are only following the one girl on her journey in this opening sequence tells the audience the rest of the film may be in restricted narration as so far the audience can only see what the girl can see. This could mean there is a sense of mystery and there is more likely to be shocking events.
Research: Key Conventions
 An important point of an opening credit sequence is introducing the cast and crew.
 This is done by names appearing appropriately next to the character in most films.
The title sequence might also show a narrative which the audience might see
 throughout the rest of the film. Also use of enigma codes make the audience want to watch the film and find out what is actually happening, questions may be put forward that they want to find the answer to, or disruptions, for example seen in London To Brighton where the audience would want to see them resolved or see a "happy ending".
  Key characters should also be introduced, the audience should clearly see some qualities of their personality or life. For example, in the exposition sequence Dave from Kick Ass is shown to be quite average and finds it hard to be noticed by females.
 Time and place is extremely important to inform the audience about what relevant events are happening when and where. For example In Kick Ass the storyline jumps back and forward, showing flashbacks to create tension.
Main Task
Create the titles of a new fiction film to last a maximum of two minutes.
The deadlines for this task are as follows;
The deadlines for this task are as follows;
Research Deadline: 26/11/10
Photo-storyboard Deadline: 3/12/10
Filming Deadline: 07/01/10
Production Deadline: 28/01/10
Evaluation Deadline: 11/02/10
Monday, 18 October 2010
3 Targets
I think I could improve on these three things:
I feel I need to become more familiar with premier editing software, to do this I should practise and ask for more help when using this software in lessons.
Second I need to revise basic media terminology and practise recognising camera angles and shots.
Finally I need to meet deadlines sufficiently, to do this I will complete any work not completed in the lesson in the first free time I have after the lesson.
Tuesday, 12 October 2010
Evaluation
Looking back on the task, Iv learned a lot about continuity, organisation, and technology.
Continuity editing is where the work of the editor is to edit the clips together so they make sense to the audience and so the film looks real life, the audience can empathise and feel more involved. The main rules of continuity editing can be found in a previous post.
We used digital SLR cameras to take the photographs for the story board, I found it easy to use the camera, and for the majority of shots we used the auto setting. We imported the images one by one onto the story board to ensure they were in order. This allowed us to find out what angles and shots we needed for our film.
We have learnt to use our time wisely whilst filming. We should have got all of the conversation shots before filming cut away's as when we went back to re filming some parts where we had made mistakes the actors were not wearing the same clothes which would have made the film non-continuous.
Personally I enjoyed using the digital video cameras and found it easy to use once I knew how to use it. However moving the camera to film pan shots on the tripod I found difficult as it was quite stiff and not easy to move.
To upload our footage to On Location we plugged the camera into a USB slot and recorded the footage onto On Location. To split the footage up into different shots, we pressed the pause button every time there was a shot change, which broke the film up into chunks we could edit.
We then opened these chunks of film to Premiere where we edited the film together.
The most important tool we used was the flip tool, as we had filmed part of the scene from an opposite angle the 180 degree rule was not visible,so we flipped the part that was wrong to make the whole thing continuous.

To present the video on my blog, I uploaded it to youtube after making a youtube account, then pasting the embedded code into the 'edit html' section on the blog.
I found blogger really helpful to keep track of my completed and uncompleted work, also all work looks presentable and is easy to understand.
Continuity editing is where the work of the editor is to edit the clips together so they make sense to the audience and so the film looks real life, the audience can empathise and feel more involved. The main rules of continuity editing can be found in a previous post.
We used digital SLR cameras to take the photographs for the story board, I found it easy to use the camera, and for the majority of shots we used the auto setting. We imported the images one by one onto the story board to ensure they were in order. This allowed us to find out what angles and shots we needed for our film.
We have learnt to use our time wisely whilst filming. We should have got all of the conversation shots before filming cut away's as when we went back to re filming some parts where we had made mistakes the actors were not wearing the same clothes which would have made the film non-continuous.
Personally I enjoyed using the digital video cameras and found it easy to use once I knew how to use it. However moving the camera to film pan shots on the tripod I found difficult as it was quite stiff and not easy to move.
To upload our footage to On Location we plugged the camera into a USB slot and recorded the footage onto On Location. To split the footage up into different shots, we pressed the pause button every time there was a shot change, which broke the film up into chunks we could edit.
We then opened these chunks of film to Premiere where we edited the film together.
The most important tool we used was the flip tool, as we had filmed part of the scene from an opposite angle the 180 degree rule was not visible,so we flipped the part that was wrong to make the whole thing continuous.

Personally I found it quite hard trimming the clips to fit together and making match on action actually match up, I thought this was very difficult. Also it was very annoying when we had to film 'cut away's' to cover up mistakes in angle changes.
To present the video on my blog, I uploaded it to youtube after making a youtube account, then pasting the embedded code into the 'edit html' section on the blog.
I found blogger really helpful to keep track of my completed and uncompleted work, also all work looks presentable and is easy to understand.
Monday, 11 October 2010
Post Production
The editing process was quite easy, once we learned how to us the software. There were a few gaps in the film which were able to be covered by use of editing.
Our finished video,
Our finished video,
Production
During filming, it took a while for us to get used to using the equipment, it was temperamental as the battery life did not always last throughout our filming time, however I feel we used the time effectively and got a good result. I enjoyed putting filming different angles and shots. At some points it was also hard to film because of other people around either making noise or walking in front of the shot.
Pre-Production task
Before we started filming, we drew out a basic story board, explaining the different shots and angles we wanted in our video. Then we used an slr camera to take pictures of the shots and locations, with these we made a more detailed story board. We made these story boards so we had a clear idea of what we were filming, this improved the quality of the video. In addition to this we planned out a script, locations and a cast.


Tuesday, 28 September 2010
Continuity editing.
Continuity editing is to make actual editing almost invisible and appears continuous as if a story is being told, so the audience cannot notice it. Continuity editing adds realism and makes the audience empathise more.
The key rules of continuity editing are: the 180 degree rule, match on action cuts, 30 degree rule, eye line match and basic shot types including establishing shots.

The key rules of continuity editing are: the 180 degree rule, match on action cuts, 30 degree rule, eye line match and basic shot types including establishing shots.

Monday, 27 September 2010
Preliminary task
For our preliminary task we have to film and edit a character opening a door, crossing a room and sitting down in a chair opposite another character, then having a short conversation, this video should show match on action, shot/reverse shot and the 180-degree rule. Also a cut-in needs to be included and needs to be relevant to the conversation taking place.
Subscribe to:
Comments (Atom)